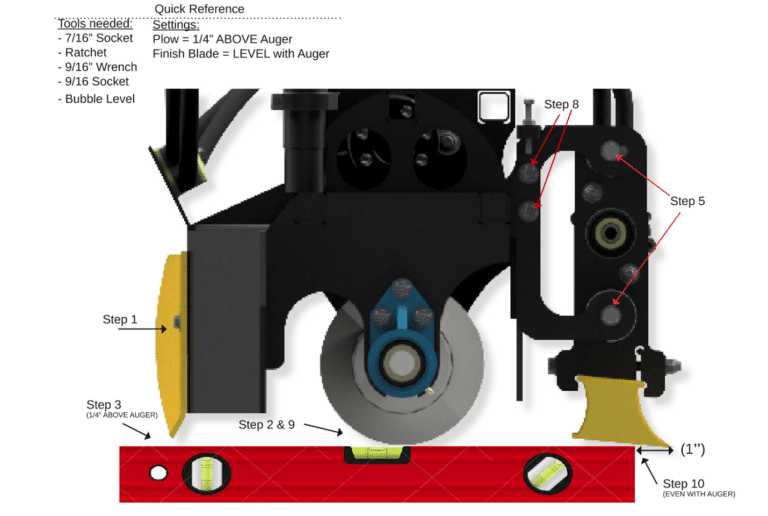
Tools needed are both a 7/16″ and 9/16″ socket and wrench as well as a bubble level.
For quick reference settings: the plow should be set 1/4″ above the bottom of the auger and the finish blade level with the bottom of the auger.
Note: the screed head must be level for all adjustments to be accurate.
To level the screed head, boom out until a bubble level can be placed on the 6″ boom section. Adjust downriggers until the boom is level and the screed head is relatively level from side to side.
- Loosen but do not remove all the lower bolts on the lower section of both adjustable plow sections. Loosen the plow upper bolts and locknuts but do not remove them.
- Place the bubble level so it rests on the flight of the auger and sits level.
- Set the plow height to ¼” above the bubble level and tighten the nearest lower plow bolt. Recheck for accuracy. Perform the same on the second plow section.
- Repeat plow adjustment (Steps 2 & 3) for the opposite side of the screed head. Retighten all plow bolts.
- Loosen the outer bolts on the finish blade bushings on both sides of the head.
- Torque the finish blade down so the top bushing’s bolt is in the slotted hole of the bracket, so it is at its outmost position for maximum blade pitch.
- Repeat finish blade pitch (Steps 5 & 6) for the opposite side of the screed head. Retighten bushing bolts when done.
- Loosen the bolts & lock nuts from the finish blade height adjustment bracket. (To adjust the height, loosen the jam nut and turn the screw clockwise to raise, and counterclockwise to lower the finish blade.) (To adjust the height, loosen the jam nut and turn the screw clockwise to raise and counterclockwise to lower the finish blade.)
- Place the bubble level so it sits on the flight of the auger and sits level.
- Set the finish blade height so it is even with the auger flighting at a distance of 1” in from the finish blade edge (bubble level edge MUST touch finish blade at 1” in from the finish blade edge). Retighten bolts & lock nuts. Recheck for accuracy.
- Repeat finish blade height adjustment (Steps 8, 9, & 10) for the opposite side of the screed head.
About Ligchine®: Ligchine is a global leader in innovative and labor-saving concrete machinery. Since its founding in 2008, the company has rapidly expanded its position in the market and offers a complete line of automated concrete screeding and placing machines that service flatwork companies from small owner-operated businesses to large global concrete contractors. The company’s headquarters, engineering, and manufacturing are located in the United States. In addition to a direct sales force in the U.S., the company has an extensive network of international dealers and partners to serve customers anywhere in the world.
Media Contact:
Heather Hughes
[email protected]